
 WhatsApp: +86 16626708626
 Email:
  Phone: +86 16626708626
Description
Product Core Brief
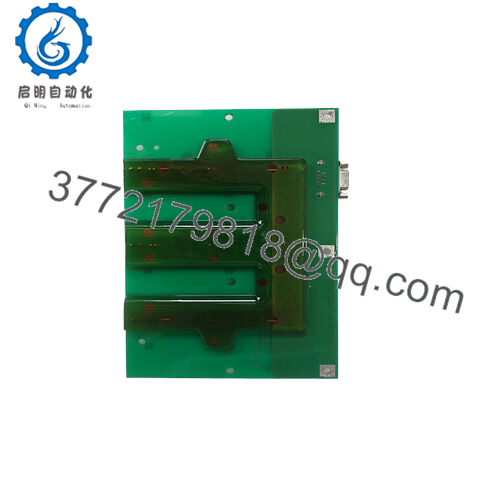
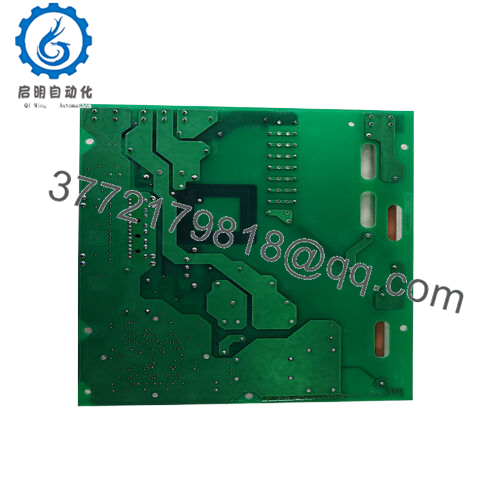
- Model: 3BHL000519P0001
- Brand: ABB
- Series: ABB Medium/High-Voltage Drive DC Link Components
- Core Function: DC bus energy storage and ripple smoothing
- Product Type: Film DC capacitor assembly (2×1,300 µF)
- Key Specs: 2×1,300 µF, 2,660 V DC, film dielectric
- Condition: New Original / New Surplus
Key Technical Specifications
| Parameter | Value |
|---|---|
| Product ID | 3BHL000519P0001 |
| ABB Type Designation | 2×1,300 µF, 2,660 V, film |
| Capacitance | 2×1,300 µF (nominal) DC |
| Rated DC Voltage | 2,660 V DC |
| Dielectric Type | Film capacitor (DC application) |
| Application | DC link / DC bus capacitor in ABB drives (e.g., ACS/DCS series) |
| Country of Origin | France (FR) |
| Customs Tariff Number | 85322900 (capacitors, fixed, >0.5 V) |
| Replaced Product ID | HL000519P0001 |
| Part Type | New, not made-to-order |
Product Introduction
The ABB 3BHL000519P0001 is a high-voltage DC film capacitor assembly rated at 2×1,300 µF and 2,660 V DC, designed for use as a DC link capacitor in ABB variable-speed drives and DC systems. It stabilizes the DC bus, stores energy, and reduces ripple in medium- and high-power converter applications.drives-center+1
In the field, this unit typically sits in the DC link of ACS- and DCS-family drives where failure can mean blown input fuses or nuisance trips under load. Engineers choose the original ABB-specified capacitor because its voltage rating and film construction align with the OEM drive design, avoiding dielectric stress and lifetime issues common with underspec’d third-party parts. Always verify mechanical fit and discharge circuits against the drive’s service manual before replacement.motors.
Installation & Configuration Guide
Stage 1: Pre-Installation Preparation (20–30 minutes)
⚠️ Safety First: You are dealing with a DC bus in the kilovolt range; an error here is not a nuisance fault, it is a hospital visit. Notify operations, schedule downtime, and apply full lockout/tagout on incoming AC feeders and any auxiliary DC supplies. Verify absence of voltage on the DC bus with a properly rated CAT III/CAT IV meter, and then wait at least 15–30 minutes for internal discharge resistors to work before touching anything.
- Tools Required:
- ESD wrist strap (for control wiring area, even though this is power hardware)
- Insulated socket set and torque wrench rated for the drive’s hardware sizes
- High-voltage rated multimeter (CAT III / CAT IV, 1,000 V)
- Insulated screwdriver set
- Infrared thermometer or thermal camera for post-start checks
- Wire labels and a smartphone for photos
- Data Backup:
- Capture clear photos of the existing capacitor bank: wiring orientation, terminals, busbar layout, and any bleed/discharge resistors.
- Note the existing nameplate data (capacitance, voltage, temperature class) and compare with 3BHL000519P0001 to confirm it is a like-for-like or ABB-recommended replacement.
Stage 2: Removing the Old Capacitor Assembly (15–20 minutes)
- Confirm Zero Energy: Check DC bus voltage again just before loosening anything. For medium-voltage drives, you often have multiple capacitors in series/parallel; verify across each segment, not just the total bus.
- Label all connections if there is any ambiguity—positive, negative, and any midpoint or sensing leads.
- Loosen busbar bolts using an insulated tool, supporting the bar so it does not twist and stress neighboring terminations.
- Remove any mounting brackets or clamps holding the old capacitor assembly, then lift it out with two people if the mechanical design demands it.
- Inspect busbars and mounting surfaces for pitting, carbon tracking, or overheating marks; clean contact surfaces with a non-abrasive method and ensure flatness.
⚠️ Keep the old capacitor isolated and clearly marked “DO NOT REUSE” until you finish commissioning; if you have to revert, you want to be absolutely sure which unit is which.
Stage 3: Installing the New Capacitor Assembly (20–30 minutes)
- ESD and Handling Prep: For the capacitor itself, ESD is less critical than with logic boards, but you still want clean handling—no dropping, no mechanical shock, no touching bare terminals with uninsulated tools.
- Mechanical Fit: Position the 3BHL000519P0001 in the original mounting location. Confirm that mounting holes, clearances to adjacent busbars, and creepage distances meet or exceed the original installation. Do not “force fit” this component—if the mechanical layout changed, you need to re-check clearances against ABB guidelines.
- Electrical Connections:
- Reinstall busbars/terminals in the same orientation and order as documented in your photos.
- Use the torque values specified in the drive’s service or installation manual; over-torque can crack insulators, under-torque can cause local heating and eventual failure.
- Ensure any parallel capacitor connections have equal conductor lengths to keep current sharing reasonable.
- Confirm that discharge resistors and any voltage-sensing leads (for DC link monitoring) are wired as previously and firmly secured.
Self-Checklist:
[ ] Mechanical mounting rigid, no movement under hand pressure
[ ] All bolted joints torqued to spec
[ ] No tools or hardware left in the cabinet
[ ] Polarity double-checked vs. photos and schematics

- 3BHL000519P0001
Stage 4: Power-On & Testing (20–40 minutes)
Pre-Power Checks:
- Using the meter on resistance range, confirm there is no unintended short between DC+ and DC−. You will typically see charging of the capacitor via bleed resistors, so read the value over a few seconds and interpret accordingly.
- Verify clearance distances and that no cable/busbar is touching sharp edges or grounded metal unintentionally.
Power-On Steps:
- Controlled Energization: If the system has pre-charge circuitry, make sure it is functional and enabled; do not bypass pre-charge on a fresh capacitor bank.
- Re-energize the main AC supply with the drive in a safe, non-run condition (no run command). Monitor DC link voltage ramp-up and ensure it follows the expected pre-charge profile.
- Use the drive’s diagnostic pages (for ACS/DCS) to monitor DC bus voltage and ripple under no-load conditions. Ripple should be consistent with OEM specifications; large ripple at light load can indicate a connection issue or defective unit
- Gradually apply load: first a low-load or test run, then up to normal operating current while monitoring temperatures around the capacitor with an IR thermometer. Look for hotspots at terminals and busbar joints.
⚠️ Troubleshooting Note:
- If the drive trips on DC overvoltage or undervoltage immediately after replacement, suspect wiring errors, incorrect part rating (voltage or capacitance), or a problem in the pre-charge circuit—not just a “bad new part.”
- Audible noise or visible “breathing” of the capacitor housing under operation is a red flag; isolate and investigate before continuing.
Frequently Asked Questions (FAQ)
Q1: What exactly is the ABB 3BHL000519P0001 used for?
It is a DC bus capacitor assembly—2×1,300 µF at 2,660 V DC—used primarily in the DC link of ABB drives and converter systems to store energy and smooth the DC bus.
Q2: Is this model considered obsolete, and is available stock really new?
This capacitor is listed as a standard stocked part, not made-to-order, and is often sold as new original or new surplus for ABB drives. Many specialist distributors still show it as “NEW AND ORIGIN ITEM IN STOCK” with 12-month warranty, but you should confirm the date code and storage conditions with your supplier.
Q3: Can I replace this capacitor with a non-ABB equivalent?
Electrically you might match capacitance and voltage, but in practice I strongly recommend sticking to the ABB-specified rating and form factor. The 2,660 V DC rating and film construction are chosen to fit the drive’s insulation, pre-charge, and protection design; generic replacements often fail early due to ripple current or partial-discharge issues at this voltage level. Always cross-check with ABB’s service documentation.motors.
Q4: Do I need to change any software settings when I replace this capacitor?
Typically no; the DC link capacitor is a passive component and the drive’s control keeps the same parameters. If you have modified DC link monitoring thresholds or ramp profiles in the past, verify those against OEM recommendations after replacement, especially on older or heavily customized systems.
Q5: Why does pricing vary so much between ABB and third-party suppliers?
You’re seeing a mix of official ABB spares pricing and surplus market pricing. Some resellers source unused stock from upgrades and plant closures, which can be sold well below ABB’s list price but still be genuine, date-coded parts. The trade-off is variability in availability and batch age, so insist on clear condition statements (New Original vs. Refurbished) and written warranty.
Q6: What kind of warranty and lead time should I expect?
Many industrial parts distributors quote this part as in stock with 1–2 working day lead time from warehouse and around 12 months functional warranty. For critical applications, ask for test documentation or at least a traceable invoice from a reputable supplier.
Q7: Any practical installation pitfalls you see repeatedly with DC link capacitors like this?
The big ones are: failing to confirm the bus is fully discharged, mixing up bus polarity on complex bar arrangements, under-torqued terminals leading to overheating months later, and not checking for adequate pre-charge. A quick IR scan on the first few loaded runs and a re-torque check after a thermal cycle will save you from a lot of late-night callouts.


