
 WhatsApp: +86 16626708626
 Email:
  Phone: +86 16626708626
Description
Product Core Brief
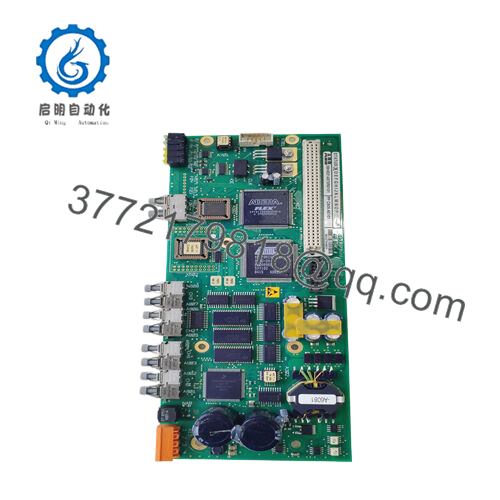
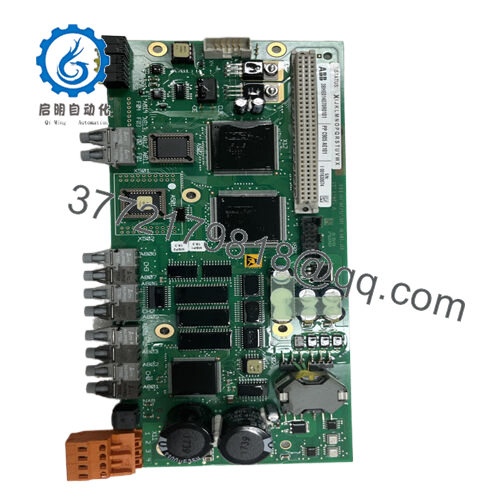
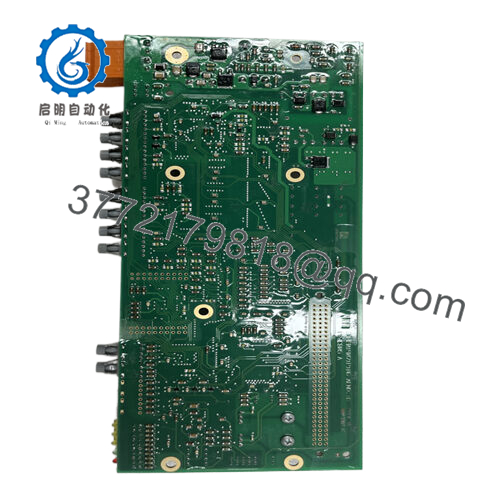
- Model: PPC905AE101 (3BHE014070R0101)
- Brand: ABB
- Series: Drive Converter Systems (ACS/PCS related, Symphony Plus compatible in some applications)
- Core Function: Converter control and processing
- Product Type: Control board (CCB-2 COMPLETE)
- Key Specs: Fast Ethernet 10/100 Mbps, high-reliability processor for drive/motor control, compact board design
- Condition: New Original / New Surplus
Key Technical Specifications
- ABB Type Designation: V PP C905 AE101
- Catalog Description: CCB-2 COMPLETE
- Input Voltage Range: Typically tied to drive system (specific converter input; often 3-phase 380–690 V class in associated drives)
- Communication Interface: Fast Ethernet (10/100 Mbps)
- Memory/Processing: General-purpose processor (GPP) architecture; exact RAM/Flash varies by firmware (typically 64–256 MB class in similar boards)
- Operating Temperature: −20 to +60 °C (typical for ABB drive electronics; verify with system datasheet)
- Dimensions (approx.): 250 mm × 100 mm × 30 mm (board level; exact varies)
- Weight (net): 0.25–0.8 kg
- Mounting: Rack/board insertion in drive cabinet
- Protocols Supported: Drive-specific (internal bus + Ethernet for supervision)
- Protection Functions: Integrated overcurrent, thermal, and fault handling (drive-dependent)
Verify exact parameters against the specific drive system datasheet before ordering — mismatches in firmware or bus can halt commissioning.
Product Introduction
The ABB PPC905AE101 (3BHE014070R0101), labeled CCB-2 COMPLETE, serves as the main control board in certain ABB medium-voltage drive systems and frequency converters. It handles core processing for motor control loops, power stage gating, fault detection, and external communication in applications like pumps, fans, compressors, and rolling mills.
Engineers choose this board for its proven reliability in harsh environments and tight integration with ABB’s drive firmware. It delivers precise torque/speed regulation and supports Ethernet-based monitoring, making it a direct fit for legacy ACS6000 or similar converter setups where downtime costs run high.

- PPC905AE101 3BHE014070R0101
Installation & Configuration Guide
Stage 1: Pre-Installation Preparation (10–15 minutes) ⚠️ Safety First: Notify operations of planned downtime. Confirm the drive is in a safe stopped state. Lock out/tag out all power sources (main incoming + auxiliaries). Wait at least 5 minutes for DC bus capacitors to discharge — measure 0 VDC before touching internals. Tools Required: Grounded ESD wrist strap, PH1/PH2 screwdriver, digital multimeter, permanent marker + wire labels, smartphone/camera for photos. Data Backup: Export current drive parameters and firmware version via the operator panel or DriveWindow/800xA tools. Photograph all board DIP switches (if present), jumper positions, LED status, and cable routing.
Stage 2: Removing the Old Module (5–10 minutes)
- Open the drive cabinet door and locate the control section.
- Label and carefully disconnect all ribbon cables, power connectors, and communication plugs — do not yank; release latches first.
- Loosen any retaining screws/clips. Gently pull the board straight out to avoid damaging backplane pins or edge connectors.
- Inspect the slot for dust, corrosion, or bent pins — clean with compressed air if needed. ⚠️ Note: Keep the old board untouched until the replacement runs without faults — you’ll need it for comparison if issues arise.
Stage 3: Installing the New Module (10–15 minutes)
- Ground yourself with ESD strap. Confirm the replacement part number matches exactly (PPC905AE101 3BHE014070R0101).
- Configuration Clone (Crucial): Match every DIP switch and jumper setting from your photos. Node address, baud rate, or termination settings wrong here cause most comms failures.
- Align the board with the slot guides and push firmly until it seats (listen for the click; ensure full insertion). Secure any screws/clips.
- Reconnect all cables exactly as labeled — torque terminals to spec (usually 0.5–0.8 Nm). Self-Checklist: [ ] DIPs/jumpers match photo, [ ] All connectors fully seated, [ ] No loose wires, [ ] Board fully locked in place.
Stage 4: Power-On & Testing (15–30 minutes) Pre-Power Check: Use multimeter to verify no shorts on power rails (typically 24 VDC control supply). Power-On Steps:
- Energize control power only (keep main drive power off initially).
- Watch LEDs: Power/OK green = normal; any red ERR/fault = stop and diagnose.
- Connect to programming tool (Drive composer or equivalent), confirm firmware version matches original (mismatch often throws timeout errors).
- Download saved parameters if needed; perform parameter consistency check.
- Enable dry-run mode (no motor rotation) and test I/O signals, comms handshake, and basic status. ⚠️ Troubleshooting Note: Solid red ERR usually points to firmware mismatch or config error — reload from backup. No Ethernet link? Check cable, IP settings, and port negotiation. If board smokes or pops, kill power immediately — ESD damage from handling is common in dry environments.
Follow these steps and 90% of swap issues disappear.
Frequently Asked Questions (FAQ)
Can this board be hot-swapped under power? No. Never hot-swap control boards in ABB drives. Removing or inserting under power risks arcing on backplane pins or frying sensitive electronics. Always isolate power and discharge capacitors first.
Is this model obsolete, and is your stock genuinely new? Yes, it’s a legacy/spare part — no longer in active OEM production for new builds. We source new surplus/stock from verified channels (OEM packing lists, factory-sealed where possible). Every unit goes through inbound visual/traceability checks, 24+ hour powered testing in a simulated drive rack, and insulation/continuity verification. Test photos and reports available on request.
What is the direct replacement if this is out of stock? No plug-and-play direct successor exists for all applications — it ties closely to specific ACS6000/PCS6000 generations. Contact ABB support with your drive serial number for the latest recommended upgrade path (often involves firmware + hardware bundle). We can cross-check compatibility before shipping alternatives.
Will I lose my programming/parameters when I pull the old board? Usually no — parameters store in non-volatile memory on the board or separate flash/parameter unit. But always export via the tool before removal. I’ve seen cases where a partial backup missed custom macros, forcing hours of rework. Export everything.
Why is the price lower than OEM factory list? This is surplus/new-old-stock, not direct-from-ABB channel. OEM pricing includes full certification, ongoing support contracts, and margin for new production runs. Our units are tested functionally in real racks but lack the factory warranty seal — we back them with our own 1-year replacement warranty instead.
How do you test these boards before shipping? We power them in a matched drive simulation setup (or equivalent test rack), run comms pings over Ethernet, cycle through status modes, monitor thermals for 24+ hours, and Megger insulation at 500 V (>10 MΩ). Full test report generated. No “bench power only” shortcuts.


