
 WhatsApp: +86 16626708626
 Email:
  Phone: +86 16626708626
Description
3. Key Technical Specifications
| Parameter | Value |
|---|---|
| Ports | 48 × 10GBase-T (1/10G) |
| Uplink Ports | 6 × QSFP28 (40/100G, breakout supported) |
| Switching Capacity | ~2.16 Tbps |
| Forwarding Rate | ~1,600 Mpps |
| Latency | <650 ns |
| Layer Support | L2 / L3 (full routing stack) |
| Routing Protocols | BGP, OSPFv2/v3, IS-IS, RIP, VRRP, PIM |
| Virtualization | Virtual Chassis, VXLAN, SPB |
| Form Factor | 1U rack-mount |
| Cooling | Front-to-rear airflow |
| Power Supply | Dual AC (typically 400 W redundant) |
| Operating Temp | 0°C to 45°C |
4. Product Introduction
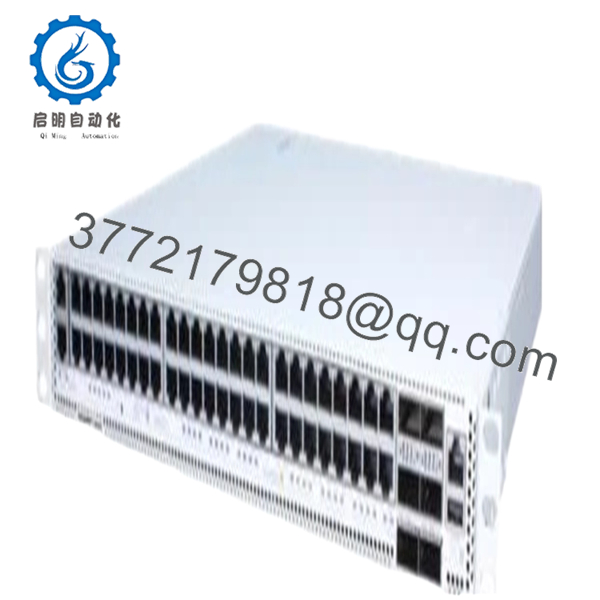
The Alcatel-Lucent OS6900T48-F-EU is a high-density 10 Gigabit Layer 3 switch designed for core, aggregation, and data center fabric deployments. It belongs to the OmniSwitch 6900 family and provides wire-rate switching with sub-microsecond latency.
In real deployments, this model is typically used as a Top-of-Rack (ToR) or spine switch in data centers, or as a campus core switch. The combination of 48 copper 10G ports and 100G uplinks makes it suitable for converged traffic (voice, storage, and data) while supporting advanced routing and virtualization features.

- OS6900T48-F-EU
5. Installation & Configuration Guide
Stage 1: Pre-Installation Preparation (Estimated: 15–20 minutes)
- ⚠️ Safety First:
Notify NOC. Drain traffic. Disable interfaces. If not using ISSU, power down the switch. - Tools Required:
ESD strap, rack kit, torque screwdriver, fiber cleaning kit, laptop (CLI access) - Data Backup:
- Save running config (
write memoryor equivalent) - Export routing tables and VLAN config
- Document port mappings and uplinks
- Save running config (
Stage 2: Removing the Old Switch (Estimated: 10–15 minutes)
- Shutdown all interfaces
- Label all copper and fiber connections
- Disconnect cables (keep optics paired)
- Remove rack screws and slide unit out
- Inspect rack rails and airflow path
- ⚠️ Note: Keep old switch powered off but available for rollback
Stage 3: Installing the New Switch (Estimated: 15–20 minutes)
- Apply ESD protection
- Mount switch in rack (1U position)
- Connect dual power supplies
- Reconnect copper and fiber links
- Ensure airflow direction matches rack design
- Self-Checklist:
- Power redundancy active
- Correct uplink ports used
- Airflow direction consistent
Stage 4: Power-On & Testing (Estimated: 20–30 minutes)
- Pre-Power Check:
Verify grounding and no short circuits - Power-On Steps:
- Boot switch and access CLI
- Verify hardware (
show system) - Load configuration
- Check routing (
show ip route) - Validate uplinks and traffic
- ⚠️ Troubleshooting Note:
- Ports down → check SFP/QSFP compatibility
- Routing issues → firmware or config mismatch
6. Frequently Asked Questions (FAQ)
Q1: Can this switch be hot-swapped?
No.
This is a fixed chassis switch. You can hot-swap power supplies, but not the entire unit. Plan a maintenance window.
Q2: Is OS6900T48-F-EU still supported?
It’s in late lifecycle.
You’ll still find it in production, but newer OmniSwitch models (OS6900-X series) are replacing it.
Q3: What’s the real use case—core or ToR?
Both.
I’ve deployed it as ToR in smaller DCs and as aggregation/core in campus networks. It depends on scale.
Q4: Does it support VXLAN and modern DC features?
Yes, but with limits.
VXLAN and SPB are supported, but compared to newer platforms, control-plane scalability is lower.
Q5: Why choose this over Cisco Nexus or Arista?
Usually cost and existing ecosystem.
Technically solid, but ecosystem/tooling is not as mature as Cisco/Arista.
Q6: Most common field issue?
❗ Optics compatibility and firmware mismatch.
I’ve seen QSFP modules rejected because they weren’t vendor-approved.
SOP Quality Transparency (Inspection & Testing Process)
1. Inbound Inspection & Traceability
- Verified model: OS6900T48-F-EU
- Serial number logged and cross-checked
- Visual inspection: ports, heatsinks, PSU slots
- No corrosion or connector damage
2. Live Functional Testing
- Tested in lab rack with 10G and 100G links
- CLI access and boot sequence verified
- Port throughput test using traffic generator
- 24-hour burn-in under load
- CLI logs and test reports available upon request
3. Electrical Parameter Testing
- PSU voltage stability verified
- Ground continuity check
- Load test under full port utilization
4. Firmware & Configuration Verification
- OS version documented (AOS release)
- Boot image validated
- Default config reset and tested
5. Final QC & Packaging
- ESD-safe packaging
- Port dust covers installed
- Reinforced shipping carton
- QC Passed label with traceability
Technical Pitfalls & Survival Guide
1. Firmware Version Mismatch
❗ Classic issue.
I’ve seen stacking fail because two switches ran slightly different AOS versions.
Avoidance: Standardize firmware before deployment.
2. Optics Vendor Lock
❗ Some firmware restricts non-approved optics.
Avoidance: Use certified SFP+/QSFP or enable compatibility mode (if supported).
3. Power Budget Miscalculation
Fully populated QSFP ports draw significant power.
Avoidance: Verify PSU redundancy and load margins.
4. Airflow Direction Mistake
Front-to-back vs back-to-front mismatch can overheat racks.
Avoidance: Match airflow with data center design.
5. Configuration Model Differences
❗ CLI is not Cisco-like.
Engineers often struggle initially.
Avoidance: Pre-stage configs and test in lab.


