

 WhatsApp: +86 16626708626
 Email:
  Phone: +86 16626708626
Description
- Key Technical Specifications
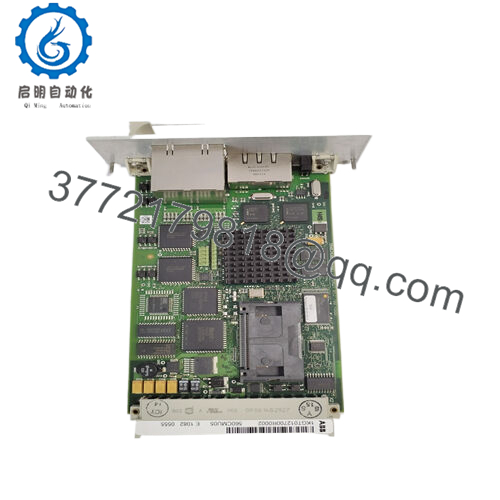
- Part Number: 1KGT012700R0001
- Alternate Designation: 560CMU05 (often REV 3.1)
- CPU: 32-bit (AMD ELAN520 @ 133 MHz or equivalent)
- Memory: 128 MB Flash, 64 MB RAM
- Serial Interfaces: 4 ports (configurable RS-232 or RS-485, up to 38.4 kbps typical)
- Ethernet Interfaces: 2 ports (10/100 Base-T, RJ45)
- Supply Voltage: 24–48 V DC
- Power Consumption: 20 W nominal
- Operating Temperature: −20 to +70 °C
- Mounting: Rack-mounted in RTU560 housing (e.g., via BCU bus connection unit)
- Dimensions: Approx. 10.2 × 8.8 × 13.5 cm (module envelope)
- Weight: Approx. 0.3–0.6 kg
- Protocols: Supports DNP3, IEC 60870-5-101/104, Modbus, proprietary bit protocols (e.g., Hitachi, Conitel); web server for diagnostics
- Product Introduction The ABB 560CMU05 (1KGT012700R0001) is the central communication and processing module in ABB’s RTU560 Remote Terminal Unit series, used primarily in substation automation, telecontrol, and SCADA systems for utilities and industrial processes. It coordinates I/O scanning, event handling, and data exchange over serial and Ethernet links.
Field teams rely on it for reliable multi-interface operation in mixed-protocol environments—handling legacy serial links alongside Ethernet upgrades without immediate full replacement. Surplus stock dominates availability since it’s phased out in favor of newer CMU models (e.g., 560CMR02 for enhanced IEC 61850).

- 560CMU05 1KGT012700R0001
- Installation & Configuration Guide
Stage 1: Pre-Installation Preparation (15–20 minutes) ⚠️ Safety First: Notify operations of RTU downtime. Verify safe state (no active control). Lock out/tag out power supplies. Wait 5 minutes for discharge. Tools Required: ESD wrist strap, PH1/PH2 screwdriver, Fluke multimeter, wire labels, laptop with RTU560 configuration tool (e.g., RTU500 Service Tool or web browser), smartphone for photos. Data Backup: Connect via Ethernet or serial; export configuration (protocol settings, I/O mappings, PLC logic if licensed). Photograph front panel LEDs, serial/Ethernet port assignments, CompactFlash card (if used), and any DIP/jumper settings. Document firmware version and IP addresses.
Stage 2: Removing the Old Module (10–15 minutes)
- Power down RTU rack/power supplies.
- Label and disconnect serial cables (RS-232/485) and Ethernet RJ45s—note port designations (e.g., CPA/CPB).
- Release rack locking tabs or screws; pull module straight out to protect bus connector.
- Inspect backplane/bus connector for dust, bent pins, or corrosion—clean with compressed air. ⚠️ Note: Keep old module bagged and on-site for reference until replacement is stable.
Stage 3: Installing the New Module (15–20 minutes)
- Ground with ESD strap. Verify part number matches 560CMU05 1KGT012700R0001 (check revision if critical).
- Configuration Clone (critical): Insert CompactFlash from old unit if carrying firmware/OS (or load via web tool). Match any jumpers/DIPs from photos (rare on this model). Configure Ethernet IP via laptop if needed before full power-up.
- Align with rack guides; insert firmly until seated (click/lock). Secure tabs/screws.
- Reconnect serial and Ethernet cables per labels—ensure RS-232/485 mode matches (via config if software-set). Self-Checklist: [ ] CompactFlash/firmware matched, [ ] Ports wired correctly, [ ] Module seated/locked, [ ] Cables strain-relieved.
Stage 4: Power-On & Testing (20–40 minutes) Pre-Power Check: Multimeter verify no shorts on 24–48 V DC rail and ground. Power-On Steps:
- Energize power supplies (rack only initially).
- Observe front LEDs: Power green, status for comms activity (refer to manual for specific patterns—RUN/ERR indicators).
- Connect via Ethernet/web server or serial; verify detection, check firmware, load config if required.
- Test serial/Ethernet links (ping hosts, protocol simulation if tool available).
- Enable I/O bus and monitor event polling/data exchange. ⚠️ Troubleshooting Note: ERR LED or no boot? Check power voltage, reseat module, or CompactFlash insertion. No comms? Verify IP config, cable continuity, protocol settings. Firmware mismatch in mixed RTU setups? Confirm revision compatibility.
- Frequently Asked Questions (FAQ)
Can this module be hot-swapped? No. RTU560 rack design doesn’t support live insertion/removal—risks bus faults or processor lockup. Always power down supplies first. I’ve seen partial hot-swaps corrupt configs across the rack.
Is this model obsolete, and is your stock new? Yes, legacy—not in active ABB/Hitachi Energy production (successors like 560CMR exist). We source new surplus from decommissioned RTUs or excess inventory. Each unit gets inbound traceability, 24+ hour powered test in RTU560 simulation (protocol pings, I/O bus check), insulation test (>10 MΩ at 500 V), and firmware/revision documentation. Test photos/videos available.
What is the direct replacement if out of stock? No pin-for-pin drop-in; upgrade to 560CMR02 or similar for performance/IEC 61850 boost. Requires config migration and possibly license updates. Check Hitachi Energy RTU560 migration guides for your protocol set.
Will swapping lose my RTU configuration or PLC logic? No—config and logic store on CompactFlash or internal flash. Transfer card or reload via tool. If firmware differs significantly, re-validate protocols. Always export backup first.
Why is the price lower than original ABB pricing? Surplus from phased-out systems, not current manufacture. We run full functional verification (power-up, comms loopback, thermal/load test), with our 1-year warranty—not factory coverage.
How do you test before shipping? Power each in RTU560 rack setup >24 hours, simulate serial/Ethernet traffic (protocol checks), verify bus to dummy I/O, monitor thermals, and electrical tests. Firmware version logged; report included.
Photograph all connections, LEDs, and config screens before pulling the old unit. Mirror exactly and test links dry—you’ll avoid days of protocol debugging.


