
 WhatsApp: +86 16626708626
 Email:
  Phone: +86 16626708626
Description
3. Key Technical Specifications
- Line Rate: 40 Gbps (40GBASE-LAN PHY class)
- Function Type: Optical transponder / muxponder (LAN PHY aggregation)
- Optical Technology: DWDM (C-band typical)
- Client Interface: 10G aggregation (variant dependent)
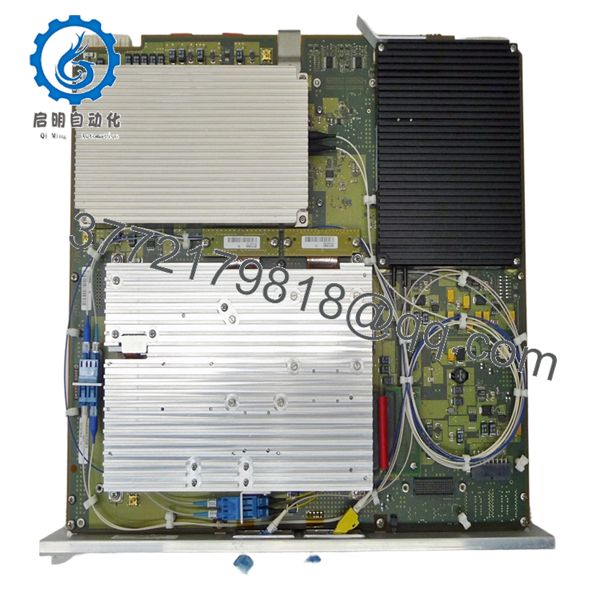
- Backplane Interface: High-speed OTN / proprietary switching fabric
- Deployment Platform: Alcatel-Lucent optical systems (1830 PSS / 169x family typical)
- Power Consumption: ~150–220 W (typical 40G card class)
- Cooling Requirement: Forced air via chassis
- Operating Temperature: −5 to +55 °C (central office environment)
- Management: NMS (e.g., 5620 SAM), SNMP, TL1
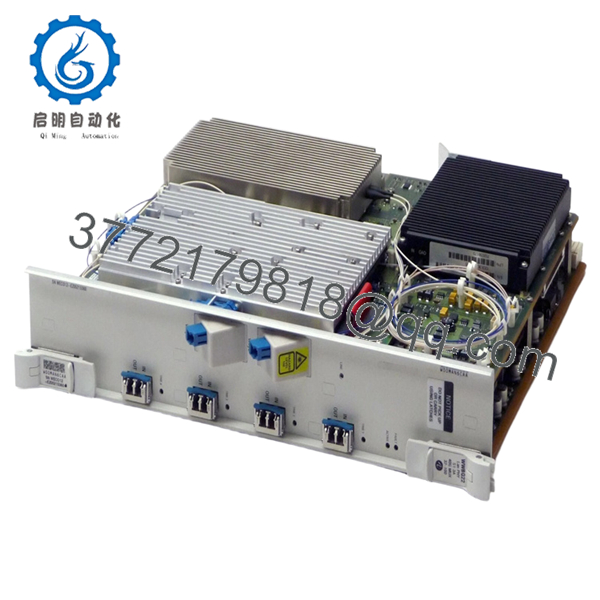
- Form Factor: Plug-in line card
4. Product Introduction
Alcatel-Lucent WWBQ22 is a 40G optical transponder or muxponder card used in DWDM transport systems. It converts client-side traffic (typically 10G signals) into a 40G optical wavelength for transmission over fiber infrastructure.
In field deployments, these 40G cards were widely used during the transition from 10G to 100G networks. You’ll still find them in metro rings and legacy backbone segments where fiber capacity is constrained but a full upgrade to 100G coherent optics hasn’t been justified.
5. Installation & Configuration Guide
Stage 1: Pre-Installation Preparation (Estimated: 15 minutes)
- ⚠️ Safety First: Coordinate with NOC, drain traffic, disable affected wavelengths. Optical transport changes can impact multiple services.
- Tools Required: ESD strap, optical power meter, fiber cleaning kit, inspection scope, multimeter, smartphone.
- Data Backup:
- Export node config from NMS (e.g., 5620 SAM)
- Record wavelength assignment and channel plan
- Capture Tx/Rx optical power levels
Stage 2: Removing the Old Module (Estimated: 10 minutes)
- Disable associated services and ports.
- Label and disconnect all optical fibers.
- Release ejector levers evenly.
- Pull card straight out — no twisting.
- Inspect slot and airflow path.
- ⚠️ Note: Keep old card for wavelength and configuration reference.
Stage 3: Installing the New Module (Estimated: 10–15 minutes)
- Wear ESD protection. Verify exact model WWBQ22.
- Insert along guide rails until fully seated.
- Lock ejector levers firmly.
- Clean and reconnect optical fibers.
- Self-Checklist:
- Correct slot type
- Wavelength/channel confirmed
- Fiber polarity correct
- Card fully seated
Stage 4: Power-On & Testing (Estimated: 20–30 minutes)
- Pre-Power Check: Inspect connectors and ensure no excessive attenuation.
- Power-On Steps:
- Enable slot via NMS/CLI.
- Confirm card recognition.
- Verify optical parameters (Tx/Rx, OSNR).
- Check wavelength lock.
- Run traffic or BER test.
- ⚠️ Troubleshooting Note:
- No optical signal → wavelength mismatch or ROADM config issue
- High BER → OSNR degradation or dirty fiber
- Card not detected → firmware or hardware revision mismatch

- WWBQ22
6. Frequently Asked Questions (FAQ)
Q1: Is WWBQ22 interchangeable with WWBQ21?
Not necessarily. They’re in the same family, but I’ve seen subtle differences in optical tuning and firmware expectations. Always verify compatibility before swapping.
Q2: Is this module obsolete?
Yes. 40G DWDM technology has largely been replaced by 100G/200G coherent optics. Availability is mostly surplus.
Q3: What happens if the wavelength doesn’t match?
❗ The link simply won’t come up.
I’ve seen engineers install the correct hardware but wrong channel — zero signal, hours wasted.
Q4: Can I upgrade directly from 40G to 100G using this slot?
Usually no. 100G cards often require different hardware (line cards, optics, sometimes even shelves). This is not a plug-and-play upgrade.
Q5: Why is my BER high after replacement?
Typical causes:
- Dirty fiber connectors
- OSNR degradation
- Incorrect amplifier settings
In one case, the issue wasn’t the card — it was a slightly misaligned ROADM filter.
Q6: Why is pricing inconsistent?
Supply comes from:
- Carrier upgrades (40G → 100G/200G)
- Decommissioned DWDM networks
Condition varies widely — always request test data.
Q7: What’s the most common installation mistake?
❗ Not verifying the wavelength plan.
I’ve seen experienced engineers skip this and spend hours troubleshooting a non-existent hardware issue.
SOP Quality Transparency (Inspection & Testing Process)
1. Inbound Inspection & Traceability
- Verified part number WWBQ22
- Serial number and labeling checked
- Optical ports inspected under microscope
- PCB inspection (no corrosion, no rework marks)
2. Live Functional Testing
- Installed in compatible DWDM test shelf
- Power-on diagnostics verified
- Optical loopback test performed
- 40G wavelength transmission validated
- 24-hour BER test under load
- Test report generated (available upon request)
3. Electrical Parameter Testing
- Insulation resistance >10 MΩ @ 500 V Megger
- Ground continuity verified
- Power draw measured using Fluke 115
4. Firmware & Configuration Verification
- Hardware revision documented
- Compatibility checked with system software
- Optical channel configuration validated
5. Final QC & Packaging
- QC sign-off with traceability record
- Anti-static (ESD) packaging
- Shock-protected industrial carton
- QC Passed label with inspection date
Test photos and videos available upon request.
Technical Pitfall & Survival Guide
1. Firmware Revision Mismatch
❗ Seen this on 40G platforms.
Card installs, but system throws alarms.
Avoidance: Match node software version before replacement.
2. Wavelength Misconfiguration
❗ Most common issue.
Hardware is fine, but no signal.
Avoidance: Document channel plan before removal.
3. Optical Power Budget Issues
40G systems are less tolerant than 10G.
Avoidance: Validate OSNR and link budget.
4. Slot Compatibility Errors
❗ Not all slots support all card types.
Avoidance: Check shelf slot function before insertion.
5. ESD Damage
❗ Silent failure risk.
I’ve seen cards pass initial tests but fail under load due to static damage.
Avoidance: Always use grounded wrist strap.


