
 WhatsApp: +86 16626708626
 Email:
  Phone: +86 16626708626
Description
3. Key Technical Specifications
| Parameter | Value |
|---|---|
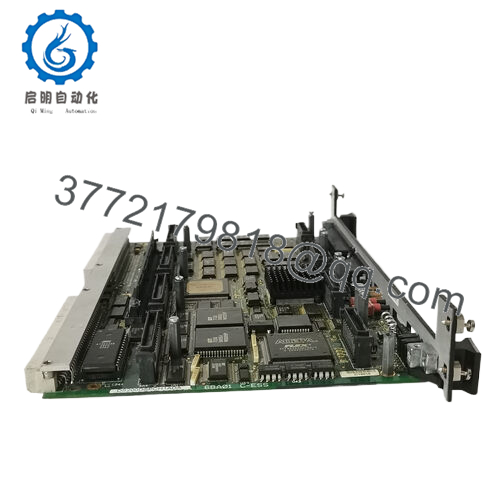
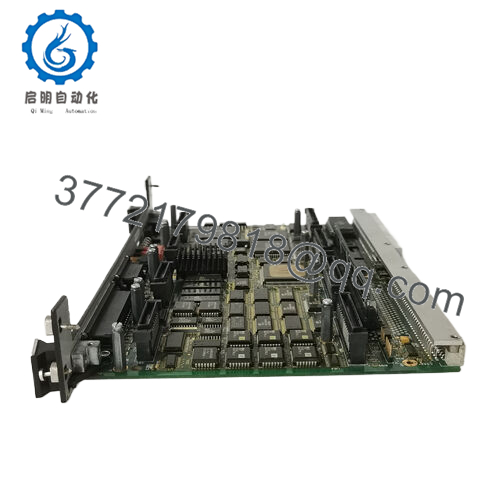
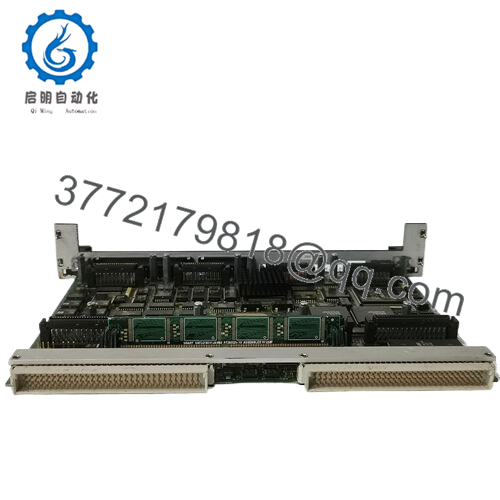
| Model | DS3800DSHA1A1B |
| Brand | GE (General Electric) |
| Series | Mark IV Speedtronic |
| Board Type | Servo Control Board (Servo Valve Driver / Position Controller) |
| Power Supply | +5V DC, ±15V DC from backplane |
| Current Draw | +5V: 0.8A, +15V: 0.5A, -15V: 0.5A |
| Command Input | 4-20 mA or ±10V (jumper selectable) |
| Position Feedback | LVDT (Linear Variable Differential Transformer) input |
| LVDT Excitation | 3 kHz, 5V RMS (internal oscillator) |
| Servo Output | ±50 mA continuous, ±100 mA peak into 40-80 ohm coil |
| Output Type | Push-pull linear amplifier (not PWM) |
| Bandwidth | DC to 100 Hz (-3 dB) |
| Linearity | ±0.1% of full scale |
| Dither Frequency | 100 Hz to 400 Hz (adjustable, 200 Hz default) |
| Dither Amplitude | 0 to 20% of full scale (adjustable) |
| Null Adjustment | ±20% of span (potentiometer) |
| Gain Adjustment | 0.5 to 10 (potentiometer) |
| Status LEDs | 4 x LEDs (Power OK, LVDT OK, Command Active, Fault) |
| Test Points | 6 x TP (Command, Feedback, Error, Output, LVDT Primary, LVDT Secondary) |
| Trim Pots | 4 x (Null, Gain, Dither Frequency, Dither Amplitude) |
| DIP Switches | 8-position (configuration for servo type and fault logic) |
| Operating Temp | 0 to +50°C (32 to 122°F) |
| Storage Temp | -40 to +85°C (-40 to 185°F) |
| Dimensions | 9.5 x 6.5 x 1.0 inches (approx) |
| Connectors | 1 x 96-pin backplane, 1 x 25-pin D-sub (field I/O) |
| GE Part Family | DS3800 (Mark IV) |
4. Product Introduction
The GE DS3800DSHA1A1B is the DSHA servo control board for the Mark IV Speedtronic turbine control system. This board drives electro-hydraulic servo valves (EHSV) that position steam turbine governor valves, intercept valves, and extraction valves. You’ll find it in every Mark IV-controlled gas or steam turbine that uses hydraulic actuation.
The DSHA board takes a 4-20 mA or ±10V command from the main processor, reads LVDT position feedback from the valve, and drives the servo valve coil with ±50 mA. The board includes adjustable gain, null, and dither settings for field tuning. It operates as a closed-loop position controller entirely in analog hardware — no processor, no firmware. This means it responds faster than software-based loops but requires manual calibration. If your turbine valve is hunting, sticking, or failing to position correctly, suspect this board.
5. Installation & Configuration Guide
Estimated time for replacement by a qualified technician: 45 minutes
Stage 1: Pre-Installation Preparation (10 minutes)
⚠️ Safety First: Notify operations of turbine shutdown. Verify the steam supply is locked out and the hydraulic power unit (HPU) is depressurized. Wait 5 minutes for hydraulic pressure to bleed down and capacitors to discharge.
Tools Required:
- ESD wrist strap (grounded to earth, not just the panel)
- Small flathead screwdriver (2.5mm) for trim pots
- Phillips #1 screwdriver for terminal blocks
- Multimeter (Fluke 87V or equivalent)
- LVDT simulator (if available) or known-good valve
- Smartphone for photos
- 4-20 mA calibrator (optional, for bench test)
Data Backup:
- Take a high-resolution photo of the board’s DIP switches (8 positions).
- Photograph all trim pot positions (Null, Gain, Dither Freq, Dither Amp). Mark the 12 o’clock position as reference.
- Note the position of all jumpers (command input select, LVDT type).
- Document the valve type and LVDT part number from the turbine documentation.
Stage 2: Removing the Old Module (10 minutes)
Step 1: Remove the 25-pin D-sub connector (field wiring). Do not pull on the cable. Loosen the two jackscrews first.
Step 2: Label each wire if the connector is not keyed. Use wire labels, not tape.
Step 3: Release the board ejectors (top and bottom). Pull the board straight out of the backplane. Do not rock it side to side — this bends backplane pins.
Step 4: Inspect the backplane connector. Look for bent pins, corrosion, or dust. Vacuum gently if needed.
Step 5: Place the old board on an ESD mat. Keep it as a reference until the new board is running.
Stage 3: Installing the New Module (15 minutes)
Step 1 (ESD): Put on your grounded wrist strap. Unpack the new DS3800DSHA1A1B on an ESD mat.
Step 2 (Verify Model): Compare the new board’s label to the old one. Confirm DS3800DSHA1A1B matches exactly. Different suffixes (e.g., A1A vs A1B) may have different null ranges.
Step 3 (Clone Configuration — Crucial):
- Set all 8 DIP switches exactly as photographed.
- Set all trim pots to the same rotational position (use a marker to note original orientation).
- Verify jumpers match (command input, LVDT type, dither enable).
Step 4: Insert the board into the same backplane slot. Push evenly until both ejectors latch. Listen for the click.
Step 5: Reconnect the 25-pin D-sub connector. Tighten the jackscrews finger-tight plus 1/4 turn. Do not overtighten.
Self-Checklist:
- DIP switches match old board
- Trim pots at original positions
- Jumpers verified
- Board fully seated (ejectors locked)
- Connector jackscrews tight
Stage 4: Power-On & Testing (10 minutes)
Pre-Power Check:
Measure resistance between each servo output pin (A, B) and ground. Should be >10k ohms. Below 1k ohm indicates a short in the wiring or valve coil.
Power-On Steps:
- Power up the Mark IV rack (24V and ±15V supplies). Do not apply hydraulic pressure yet.
- Observe the DSHA LEDs:
- Power OK (green): Must be on.
- LVDT OK (green): Should be on if LVDT connected. If off, check LVDT wiring.
- Fault (red): Should be off. If on, suspect null adjustment or LVDT failure.
- Connect the maintenance terminal. Command 0% valve position (12mA or 0V).
- Measure the servo output current between A and B pins. Should be 0 mA ±2 mA.
- Apply hydraulic pressure (coordinate with operations). Observe valve position.
- Ramp the command from 0% to 50% to 100%. Listen for smooth valve movement. No stuttering or oscillation.
- Verify LVDT feedback matches the command within ±2%.
⚠️ Troubleshooting:
| Symptom | Likely Cause | Action |
|---|---|---|
| Fault LED on, LVDT OK off | LVDT wiring reversed or open | Check LVDT primary/secondary wiring. Swap A/B if needed. |
| Valve oscillates at steady command | Gain too high or dither too low | Reduce gain pot (counterclockwise) by 20%. Increase dither. |
| Valve sticks or moves slowly | Null off or low gain | Adjust null pot until valve centers at 0% command. Increase gain. |
| Servo output stuck at ±50 mA | Output amplifier failed or coil short | Replace board. Do not operate — valve will go to hard stop. |
| No response to command | Command signal missing or jumper wrong | Measure 4-20 mA at command input terminals. Check jumper selection. |
- DS3800DSHA1A1B
6. Frequently Asked Questions (FAQ)
Q: Is the DS3800DSHA1A1B a direct replacement for DSHA1A or DSHA1A1A?
A: Yes, with recalibration required. The “1B” suffix indicates minor component changes (improved op-amps, different dither oscillator). Electrically, it’s compatible. However, the trim pot characteristics may differ. A DSHA1A1B will work in place of an earlier DSHA, but you must recalibrate null and gain. Do not assume the same pot positions will yield the same valve response. Plan for 30 minutes of tuning.
Q: Can I hot-swap the DSHA board while the turbine is running?
A: Absolutely not. The DSHA drives the servo valve directly. Removing the board removes the coil current, and the valve will go to its fail-safe position (usually closed or open depending on the spring configuration). The turbine will trip or overspeed. Procedure: Shut down the turbine, lock out steam and hydraulic pressure, remove power from the rack, then swap.
Q: Why does my valve oscillate after installing a new DSHA board?
A: Classic symptom of excessive gain. The new board has the same gain pot setting as the old one, but component tolerances mean the actual gain may be different. Fix: Turn the gain pot counterclockwise 20% (about one hour on a clock face). Retest. If oscillation stops, fine-tune gain upward until response is crisp but stable. If oscillation continues, also check dither — too little dither causes stiction-induced oscillation. Increase dither amplitude pot clockwise 10%.
Q: How do I bench test the DSHA without a turbine valve?
A: You need a ±15V and +5V power supply and a dummy load (40-80 ohm resistor, 5W minimum). Procedure:
- Apply power to the board.
- Connect a 50 ohm resistor between servo output A and B.
- Apply 12mA (or 0V) command signal.
- Measure voltage across the resistor. Use Ohm’s Law to calculate current: I = V / 50.
- Ramp command from 4mA to 20mA. Output current should follow linearly from -50mA to +50mA.
Without a load, the output voltage will saturate at ±12V. This is normal. For full testing, you also need an LVDT simulator (variable transformer). We can provide a test report from our Mark IV test stand instead.
Q: What’s the difference between DSHA and other Mark IV servo boards?
A: Quick reference:
- DSHA (DS3800DSHA): Standard servo driver for most governor and intercept valves. ±50 mA output.
- DSHB (DS3800DSHB): High-current servo driver (±100 mA) for large valves.
- DSHC (DS3800DSHC): Servo driver with built-in LVDT excitation and demodulation (DSHA has this too; DSHC is a different pinout).
- DSAI (DS3800DSAI): Analog input board for position feedback, not a driver.
The DSHA is the most common. If your valve requires >50 mA, you need DSHB. Check your valve coil resistance: R = V/I. For 40 ohms and 50 mA, that’s 2V across the coil — correct for most Moog or Rexroth valves.
Q: My LVDT feedback is noisy. Is the DSHA board bad?
A: Probably not. The DSHA has a 3 kHz excitation oscillator. Noise usually comes from:
- Shield not grounded — The LVDT cable shield must be grounded at the DSHA end only (not both ends).
- Cable too long — Keep LVDT cable under 30 meters (100 feet). Use twisted pair, individually shielded.
- Proximity to power cables — Route LVDT cable away from 480V AC or servo valve power cables (minimum 30 cm separation).
Test: Disconnect the LVDT at the valve. Measure the LVDT primary voltage at the DSHA connector. Should be 5V RMS ±0.2V. If clean, the problem is in the field cable or LVDT. If noisy, replace the DSHA.
Q: What’s your testing process for this board?
A: We test every DS3800DSHA1A1B on a live Mark IV test stand with a genuine servo valve (Moog 30 series) and LVDT simulator. Test sequence:
- Visual inspection (corrosion, burnt components, broken trim pots)
- Power-on test (current draw, LED sequence)
- LVDT excitation test (5V RMS at 3 kHz, measure with true RMS meter)
- Command input test (4-20 mA and ±10V, verify scaling)
- Servo output test: ±50 mA into 50 ohm load, linearity within ±0.2%
- Null adjustment verification (output = 0 mA at 12mA command)
- Gain verification (output change per mA command)
- Dither test (100-400 Hz, amplitude adjustable)
- 24-hour burn-in with continuous 50% command (25 mA output) and thermal monitoring
Test report with as-found null and gain values, plus recommended pot settings for your valve type, available upon request.
Q: My turbine has been running for 20 years on the original DSHA. Should I replace it proactively?
A: Yes, if downtime is expensive. The DSHA uses electrolytic capacitors in the power supply section and the LVDT demodulator. After 20 years, they drift. Symptoms: null drifts over weeks, gain changes with temperature, dither frequency unstable. Proactive replacement costs X. A turbine trip due to valve oscillation costs X per hour plus lost production. Keep a spare on the shelf. Rotate spares annually — install the spare, test the old one, keep the better one as the new spare.
Q: What’s the warranty on this obsolete board?
A: 1-year replacement warranty. Covers failure under normal operating conditions (0-50°C, correct backplane voltages). Does NOT cover damage from ESD, incorrect wiring (e.g., applying 120V AC to servo outputs), hydraulic oil contamination on the board, or physical damage. We cross-ship replacements within 24 hours for confirmed defects. We also offer a 30-day tuning guarantee — if the board works but you cannot achieve stable valve control, return it for full credit.


