
 WhatsApp: +86 16626708626
 Email:
  Phone: +86 16626708626
Description
3. Key Technical Specifications
| Parameter | Specification Value |
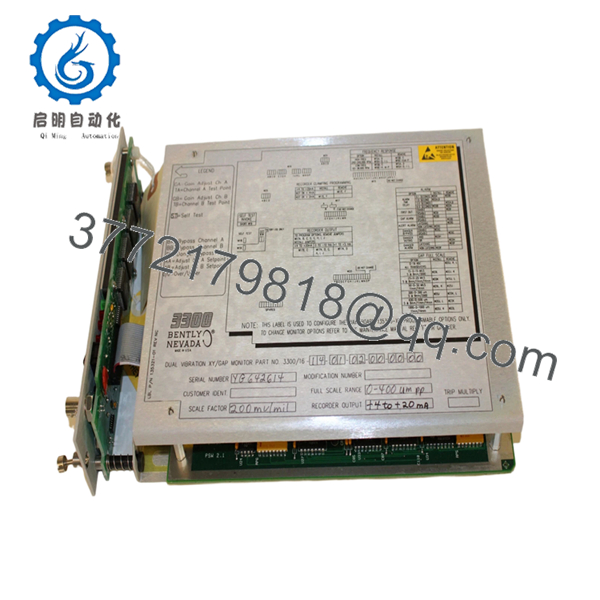
| Full Option String | 3300/16-14-01-02-00-00-00 |
| Full-Scale Range Option (-14) | 0 to 400 µm peak-to-peak (Metric scale) |
| Transducer Input Option (-01) | 3300 8mm, 3300 XL 8mm, or 7200 5mm/8mm Proximitor (200 mV/mil) |
| Alarm Relay Option (-01) | Individual channel epoxy-sealed relays installed |
| Agency Approval Option (-02) | ATEX self-certification (requires weatherproof enclosure) |
| Trip Multiply Option (-00) | None |
| Internal Safety Barriers (-00) | None |
| Special Configuration (-00) | Standard factory hardware setup |
| Signal Input Channels | 2 independent proximity probe inputs |
| Input Impedance | 10 kΩ (designed for standard Proximitor interfaces) |
| Power Consumption | 2.0 W nominal electrical draw |
| Recorder Outputs | User-programmable (+4 to +20 mA, 0 to −10 VDC, or +1 to +5 VDC) |
| Display Panel | Dual 63-segment vertical liquid crystal display (LCD) bar graphs with center gap scale |
| Operating Temperature | 0 to +65°C (+32 to +150°F) |
4. Product Introduction & Supply Chain Strategy
The Bently Nevada 3300/16-14-01-02-00-00-00 is a dual-channel machinery protection module designed to supply online condition tracking for fluid-film bearing assets such as industrial fans, large motor drives, and process pumps. By interpreting raw dynamic voltage feeds from matching 8mm or 5mm Proximitor sensors, this card computes absolute peak-to-peak radial shaft displacement alongside static DC gap readings. This dual verification path confirms that mechanical alignment, unbalance, or severe journal wear conditions are caught before causing severe asset failures.
Maintaining this exact 3300 legacy module as a Brand New Surplus spare is an essential strategy for keeping older control systems running smoothly. Because the 3300 framework is a mature product family, long factory lead times can leave your operation vulnerable to unexpected machinery blind spots. Sourcing a new surplus module avoids the dangerous internal component degradation seen in refurbished alternatives, delivering a reliable, long-term solution that lowers your overall Total Cost of Ownership (TCO) while matching your facility’s environmental certifications.

- 3300/16-14-01-02-00-00-00
5. Installation & Configuration Guide
Stage 1: Pre-Installation (Prep & Safety)
Isolate all power to the 3300 chassis panel before starting any maintenance. Put on a grounded ESD-safe wrist strap to protect the module’s delicate internal components from static damage. Before removing the old card, document all internal jumper configurations, take clear photos of the rear chassis wiring, and verify that the replacement 3300/16 hardware option codes match your system prints.
Stage 2: Removal
Unscrew the front faceplate captive mounting fasteners using a flat-head tool. Gently swing open the module ejector handles outward to unlock the rear multi-pin socket from the backplane assembly. Carefully guide the card along its chassis tracks, pulling it straight forward to avoid damaging the delicate circuit board paths or adjacent cards.
Stage 3: Installation (Clone & Seat)
Double-check that the replacement 3300/16-14-01-02-00-00-00 jumpers are set to match your original hardware profile (including frequency filters and recorder output levels). Align the card edge with the dedicated slot guide rails inside the rack space. Slide the module completely into the slot until it meets the rear connection block, then close the front handles firmly to lock the card into the backplane. Secure the faceplate captive fasteners down completely.
Stage 4: Power-On & Testing
Restore power to the main 3300 system rack and watch the front interface closely. The green “OK” LED should turn on steadily within seconds, showing a successful power-up sequence. Check the dual LCD bar graphs to ensure they read correct baseline metrics, and verify that the red “ALERT” and “DANGER” status indicators remain off under normal running loads.
6. Firmware/Software Versions & Upgrade Notes
The 3300/16-14-01-02-00-00-00 monitor relies on embedded internal microcode to execute accurate signal conversions and manage its onboard relay voting logic. This hardware configuration is fully compatible with standard legacy backplanes as well as modern Serial Data Interface/Dynamic Data Interface (SDI/DDI) frameworks.
When installing this monitor into an existing rack, make sure the card’s firmware generation aligns with your 3300/03 System Monitor interface. Mixing highly outdated firmware chips with updated communication processors can cause protocol timeouts or display errors over your serial network links. Avoid swapping or changing physical EPROMs between different monitoring modules in the field, as this can corrupt factory calibration data and throw the module’s safety parameters off spec.
7. Frequently Asked Questions (FAQ)
What specific measurement parameters do the option codes -14 and -01 designate?
The “-14” option code configures the monitor for a metric full-scale measurement range of 0 to 400 µm peak-to-peak. The “-01” option specifies that the input circuitry is calibrated for a standard 200 mV/mil transducer sensitivity, making it directly compatible with 3300 8mm, 3300 XL 8mm, or legacy 7200 5mm/8mm Proximitor sensors.
Can this specific monitor be hot-swapped while the 3300 rack is running?
Hot-swapping is not recommended for the 3300 series. Removing a module while the rack is live can trigger unexpected voltage fluctuations on the backplane, which might cause false alarm trips on neighboring cards or disrupt your plant’s emergency interlock loops. Always power down the rack or ensure the specific machine protection loop is safely bypassed before extracting any cards.
Why choose a New Surplus 3300/16 instead of a repaired or refurbished unit?
Critical machinery protection systems leave no room for compromise. Refurbished or used cards often retain worn, heat-stressed capacitors and older components that have been exposed to years of continuous factory operation. Choosing a Brand New Surplus unit guarantees you receive uninstalled, zero-hour hardware with fresh internal components, offering a dependable 10-to-15-year service life and complete reliability for your machinery loops.
Does this 3300/16 module include built-in internal safety barriers?
No, the “-00” option code for the seventh position confirms that this specific module configuration does not include internal safety barriers. If your field wiring routes through a hazardous Zone 0 or Class I Div 1 environment that requires intrinsic safety isolation, you must use external zener barriers or galvanically isolated interfaces before landing the sensor signals on this monitor.
What does the center scale on the front panel display indicate?
The two outer 63-segment LCD bar graphs show the peak-to-peak radial vibration levels for Channel A and Channel B. The third, smaller vertical scale located directly in the center is dedicated to showing the average probe gap voltage, allowing your maintenance team to quickly check shaft alignment and sensor positioning without hooking up a digital multimeter.
What kind of warranty backup comes with this new surplus monitor?
Every new surplus Bently Nevada module we provide comes standard with a full 12-month replacement warranty. If the hardware experiences any functional component issues within one year from your purchase date, we will replace the unit or credit your account, giving your team complete peace of mind.



