
 WhatsApp: +86 16626708626
 Email:
  Phone: +86 16626708626
Description
3. Key Technical Specifications
| Parameter | Value |
|---|---|
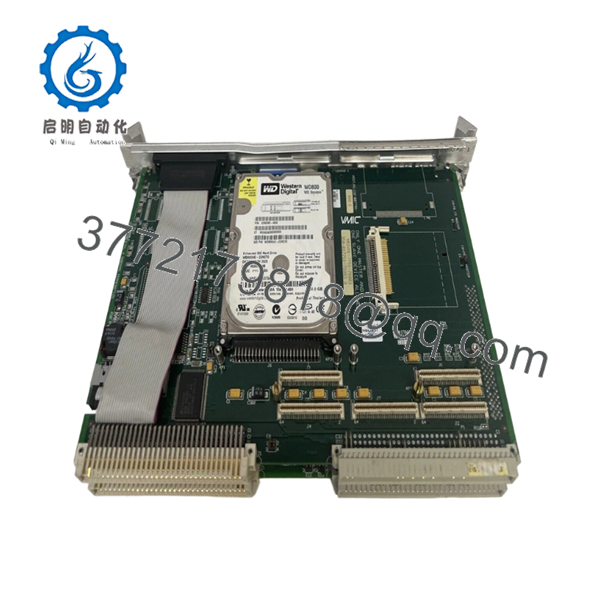
| Model Number | VMIVME-7751-76003 |
| Manufacturer | GE Fanuc / VMIC |
| Product Type | VMEbus Single Board Computer |
| Processor | Intel Pentium III |
| CPU Speed | Up to 1.26 GHz |
| Cache Memory | 512 KB L2 Cache (1.26 GHz versions) |
| System Bus | 133 MHz |
| System Memory | Up to 512 MB PC133 SDRAM |
| Bus Format | 6U VME64 SBC |
| Ethernet Ports | Dual 10/100Base-T Ethernet |
| Serial Ports | Two 16550-Compatible RS-232 Ports |
| USB Ports | Dual Front-Panel USB |
| Graphics | Integrated AGP SVGA with 4 MB Display Cache |
| Expansion | Up to 3 PMC Sites |
| Storage Support | IDE HDD, CompactFlash, Optional Ultra160 SCSI |
| VME Modes | A32, A24, D32, D16, D08, BLT32, MBLT64 |
| Watchdog Timer | Software Selectable |
| Nonvolatile Memory | 32 KB NVRAM |
| Operating Systems | Windows 2000, Windows XP, Linux, VxWorks, QNX, LynxOS |
| Product Status | Discontinued by OEM |
The VMIVME-7751 family is a Pentium III-based VMEbus single-board computer platform supporting up to 1.26 GHz processing, 512 MB SDRAM, dual Ethernet interfaces, PMC expansion, CompactFlash options, and multiple industrial operating systems.
4. Product Introduction
The GE VMIC VMIVME-7751-76003 is a high-performance VMEbus single-board computer designed for embedded control systems, military platforms, aerospace test equipment, transportation systems, and industrial automation applications requiring PC-class processing within a VME architecture. It combines an Intel Pentium III processor, VME64 interface capability, dual Ethernet connectivity, and PMC expansion support on a 6U VME platform.
In field deployments of legacy VME systems, the VMIVME-7751 was frequently selected because it allowed engineers to run Windows, Linux, VxWorks, or QNX while maintaining compatibility with existing VME I/O infrastructure. For facilities supporting long-life systems, replacing a failed SBC with the same hardware often avoids expensive software validation and platform migration projects.

- VMIVME 7751-76003
5. Installation & Configuration Guide
Stage 1: Pre-Installation Preparation (10 Minutes)
⚠️ Safety First
- Notify operations personnel of planned downtime.
- Verify the controlled process is in a safe state.
- Apply Lockout/Tagout (LOTO).
- Remove power from the VME rack.
- Wait at least 5 minutes for capacitor discharge.
Tools Required
- ESD wrist strap
- PH1 screwdriver
- Fluke 115 multimeter
- Cable labels
- Smartphone camera
- VME system documentation
Data Backup
- Create a complete image of the IDE drive or CompactFlash.
- Backup BIOS settings if accessible.
- Document network settings.
- Record VME addressing parameters.
- Photograph all PMC modules.
- Photograph front-panel and rear-transition cabling.
Stage 2: Removing the Old Module (10 Minutes)
Steps
- Shut down the operating system properly.
- Disconnect Ethernet and serial cables.
- Label all external connections.
- Remove front-panel retaining screws.
- Release extraction levers.
- Pull the board straight out.
⚠️ Note
Retain the original SBC until the replacement completes full commissioning and application testing.
Inspection Checklist
- Backplane connectors undamaged
- No bent VME pins
- No contamination
- PMC modules securely mounted
Stage 3: Installing the New Module (10 Minutes)
Steps
- Apply ESD protection before touching the board.
- Verify exact model number:
- VMIVME-7751-76003
- Configuration Clone (Critical)
- Transfer PMC modules if required.
- Match BIOS settings.
- Match boot device configuration.
- Match VME addressing settings.
- Insert the SBC into card guides.
- Seat completely into the VME backplane.
- Tighten retaining screws.
- Reconnect cables.
Self-Checklist
- Part number verified
- PMC modules installed
- BIOS settings documented
- Cabling secured
- Board fully seated
Stage 4: Power-On & Testing (20 Minutes)
Pre-Power Check
- Verify +5 VDC supply stability.
- Check rack grounding.
- Inspect VME backplane power rails.
Power-On Steps
- Power up the VME rack.
- Verify POST activity.
- Confirm video output.
- Verify Ethernet interfaces.
- Check operating system startup.
- Confirm VME communication.
- Verify application startup.
- Test connected I/O subsystems.
⚠️ Troubleshooting Note
- No video output: Check memory module seating and BIOS configuration.
- Continuous rebooting: Verify IDE or CompactFlash boot device.
- VME communication faults: Verify system controller settings and VME address mapping.
- Ethernet unavailable: Verify network configuration and driver compatibility.
SOP Quality Transparency
1. Inbound Inspection & Traceability
Each VMIVME-7751-76003 undergoes:
- OEM label verification
- Serial number recording
- Anti-counterfeit inspection
- Visual inspection for:
- Corrosion
- PCB damage
- Connector wear
- Rework marks
- Accessory verification
2. Live Functional Testing
Testing is performed on a genuine VMIVME-7751 VME chassis.
Procedures include:
- Power-on self-test
- BIOS verification
- Memory diagnostics
- Dual Ethernet communication testing
- Serial port loopback testing
- VMEbus communication verification
- Operating system boot testing
- Continuous operation exceeding 24 hours with thermal monitoring
A detailed test report is available upon request.
3. Electrical Parameter Testing
- 500 V insulation resistance test (>10 MΩ)
- Ground continuity verification
- Supply current measurement
- VMEbus interface verification
4. Firmware & Configuration Verification
- BIOS revision documented
- Boot device configuration recorded
- PMC hardware configuration documented
- Board revision archived
5. Final QC & Packaging
- QC inspector sign-off
- Anti-static ESD packaging
- Shock-resistant foam protection
- Heavy-duty export carton
- QC Passed label with inspection date
Test videos and photographs are available upon request.
Technical Pitfall & Survival Guide
❗ Firmware Revision Mismatch
I’ve seen maintenance teams replace a failed SBC and immediately face driver failures because the replacement BIOS revision differed from the original system image.
The hardware was good. The software was not happy.
Avoidance:
- Record BIOS version before removal.
- Backup storage devices.
- Verify operating system support for the replacement revision.
❗ DIP Switch / Jumper Misconfiguration
This mistake causes more startup failures than defective hardware.
Take a picture before you pull it. I can’t stress this enough.
Avoidance:
- Photograph all jumper blocks.
- Record boot settings.
- Record watchdog timer configuration.
- Verify PMC module settings.
❗ Terminal Block / Wiring Incompatibility
Even when the front panel looks identical, cable assignments can vary between revisions.
I’ve seen engineers reconnect everything from memory and spend hours troubleshooting a perfectly healthy system.
Avoidance:
- Label every cable.
- Verify connector pinouts.
- Check Ethernet and serial assignments.
❗ Power Draw Specifications
VME SBCs often become the highest power consumer in the rack.
A rack that operated comfortably with older hardware can become unstable after upgrades.
Avoidance:
- Calculate rack power loading.
- Maintain at least a 20% capacity margin.
- Verify cooling airflow.
❗ Electrostatic Discharge (ESD)
I once watched a technician swap a VME CPU board during winter maintenance without grounding himself.
The board passed POST but developed intermittent faults within days.
Avoidance:
- Wear a grounded wrist strap.
- Use ESD mats.
- Keep boards inside anti-static packaging until installation.
Keep these checks in mind and you’ll save yourself 90% of typical rework time.
6. Frequently Asked Questions (FAQ)
Q1. Is the VMIVME-7751-76003 a PLC CPU?
No.
This is a VMEbus Single Board Computer (SBC), not a PLC processor. It runs operating systems such as Windows, Linux, VxWorks, or QNX and typically serves as the primary processing platform in embedded VME systems.
Q2. Is this model obsolete?
Yes.
The VMIVME-7751 product family entered its restricted production and end-of-life phase years ago. Most currently available inventory comes from surplus stock, strategic spares inventories, or professionally tested units.
Q3. Can I move my existing hard drive to the replacement board?
Usually yes.
Many VMIVME-7751 systems use IDE drives or CompactFlash storage. However, verify BIOS settings and operating system compatibility before installation. A full disk image backup is strongly recommended.
Q4. Will my application software run on another VMIVME-7751?
Generally yes, provided:
- Hardware revision is compatible
- Operating system matches
- Required PMC modules are present
- Device drivers support the installed hardware
Always verify the exact configuration before deployment.
Q5. What operating systems are supported?
Typical supported operating systems include:
- Windows XP
- Windows 2000
- Linux
- VxWorks
- QNX
- LynxOS
Support depends on installed drivers and application software versions.
Q6. Why do many facilities still purchase this board?
Because replacing a failed VMIVME-7751 is often substantially cheaper and faster than redesigning an entire VME control platform.
In aerospace, defense, transportation, and industrial test systems, software requalification costs frequently exceed hardware costs. That reality keeps these boards in demand long after OEM production ends.
Q7. What condition is typically available?
Current market inventory is usually offered as:
- New Original (New Surplus)
- Unused Surplus
- Refurbished (Tested)
- Removed Working Spare


