
 WhatsApp: +86 16626708626
 Email:
  Phone: +86 16626708626
Description
Key Technical Specifications
- Processor: Intel Pentium M, 1.6 GHz (Dothan core)
- Chipset: Intel 855GME / 6300ESB
- Memory: Up to 1 GB DDR SDRAM (266 MHz), soldered or SODIMM options depending on revision
- VMEbus Interface: VME64x, A32/D32 master/slave, BLT support
- I/O Interfaces: Dual Gigabit Ethernet, dual PMC sites, serial ports, USB 2.0, keyboard/mouse
- Graphics: Integrated Intel Extreme Graphics 2
- Storage: CompactFlash socket, optional IDE or SATA via PMC
- Operating Temperature: 0 to +60 °C (commercial), extended temp variants available in some configs
- Power Requirements: +5 VDC at approximately 3–4 A typical (depends on memory and PMC load)
- Dimensions: Standard 6U VME single-slot width
- MTBF: Approximately 250,000 hours (calculated)
Product Introduction
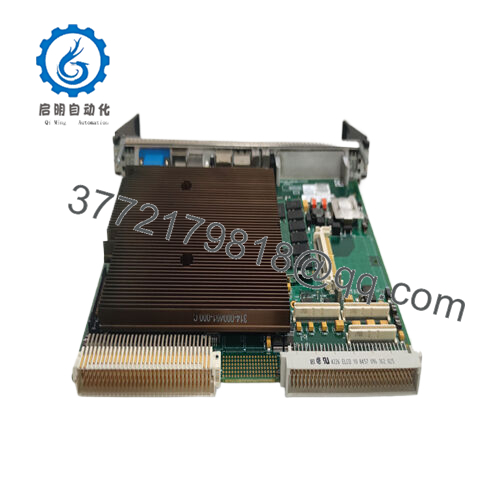
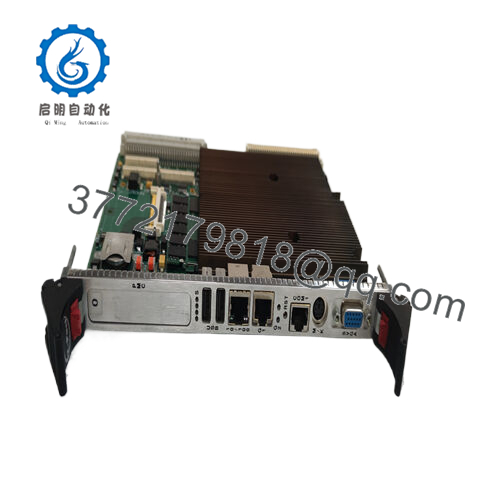
The GE VMIVME-7805 is a 6U VME single board computer based on the Intel Pentium M 1.6 GHz processor. It serves as a high-performance controller in VMEbus systems for industrial automation, simulation, military, and data acquisition applications.
In deployments of legacy VME racks, this board delivers solid processing power while maintaining full VME64x compatibility with older backplanes and I/O boards. Engineers select it for its balance of performance, I/O flexibility through dual PMC sites, and proven reliability in 24/7 embedded control environments.

- VMIVME-7805
Installation & Configuration Guide
Stage 1: Pre-Installation Preparation (15 minutes) ⚠️ Safety First: Notify operations of scheduled downtime, bring the system to a safe state, perform lockout/tagout on the VME chassis power supply, and wait at least 5 minutes for capacitor discharge. Tools Required: Grounded ESD wrist strap, flat-blade or PH1 screwdriver, digital multimeter, wire labels, smartphone for documentation. Data Backup: Export running application code and configuration files. Photograph the existing board’s jumper settings, Ethernet connections, and any PMC modules installed. Document IP addresses and VME slot address.
Stage 2: Removing the Old Module (5–10 minutes)
- Power down the entire VME chassis.
- Remove the front panel screws or ejector handles if present.
- Label and disconnect all cables (Ethernet, serial, PMC I/O, etc.). Install dust caps on connectors.
- Release the VME board ejector levers and pull the board straight out along the card guides to protect backplane pins.
- Inspect the VME backplane slot for bent pins, debris, or signs of arcing.
⚠️ Keep the removed board for reference until the new unit operates correctly.
Stage 3: Installing the New Module (10–15 minutes)
- Wear your ESD strap and work on a grounded mat. Confirm the replacement board carries the exact VMIVME-7805 part number and matches the revision level if critical.
- Configuration Clone (Critical): Set all jumpers and DIP switches to match the documented photo of the old board. Pay close attention to VME base address, system controller enable, and boot source settings.
- Align the board with the slot guides and insert firmly until it seats fully. Engage the ejector levers to lock it in place.
- Reconnect all cables using the labeled references. Torque screws to manufacturer recommendations.
Self-Checklist: [ ] Jumpers and switches match old configuration, [ ] Board fully seated with levers locked, [ ] All cables reconnected and secure.
Stage 4: Power-On & Testing (15–20 minutes) Pre-Power Check: Use a multimeter to confirm no shorts between +5 V and ground on the backplane. Power-On Steps:
- Apply power to the VME chassis only (keep field I/O disconnected initially).
- Observe front panel LEDs for boot sequence (watch for BIOS POST and VME activity indicators).
- Connect a monitor/keyboard or use serial console to enter BIOS if needed and verify hardware recognition.
- Boot into the operating system or VxWorks/QNX environment and load the previous application software.
- Run diagnostic tests on memory, Ethernet links, and VME bus access to other boards. Perform a dry-run cycle of the control logic.
⚠️ Troubleshooting Note: If the board fails to boot or shows no VME activity, check jumper settings for system controller mode and geographic addressing. No Ethernet link often results from autonegotiation mismatch or cable issues. Firmware/BIOS version mismatch with existing software can cause unexpected behavior.
Frequently Asked Questions (FAQ)
Can this SBC be hot-swapped in the VME chassis? No. Standard VMEbus does not support hot-swap for processor boards like the VMIVME-7805. Always power down the chassis completely before removal or insertion to avoid bus errors or hardware damage.
Is the VMIVME-7805 obsolete, and is the stock genuinely new? Yes, this model has been discontinued by GE/Abaco. We hold new original and new surplus inventory with traceable sourcing. Each unit receives power-on self-test, memory verification, and basic VME bus testing before shipment.
What serves as a direct replacement when this board is unavailable? Later generations such as the VMIVME-7807 or Abaco’s VPX equivalents offer higher performance, but they may require software changes and different PMC support. Confirm pinout and software compatibility before migrating. Provide your current software environment for accurate recommendations.
Will swapping the board cause loss of my existing application logic? The application code resides on storage (CompactFlash, hard drive, or network) or in the host environment, not on the processor board itself. After proper configuration of jumpers and BIOS settings, you reload or boot the existing software. Back up everything beforehand.
Why is your price lower than historical OEM list pricing? We source discontinued VME hardware through surplus channels while performing full incoming inspection and functional testing. This allows competitive pricing on legacy parts without compromising verification steps. All boards include a 1-year warranty from shipment.
Does the VMIVME-7805 support VME system controller functions? Yes, it can act as slot 1 system controller with proper jumper settings. Verify your chassis topology and ensure only one controller exists on the bus.
Keep these checks in mind when performing the swap and you will minimize typical integration issues with VMIVME-7805 boards. Test reports and photos available upon request. Always cross-reference the exact revision and firmware with your system requirements before installation.


