
 WhatsApp: +86 16626708626
 Email:
  Phone: +86 16626708626
Description
Key Technical Specifications
| Parameter | Value |
|---|---|
| Manufacturer / Brand | SST / Woodhead |
| Model | 5136-DNP-PCI |
| Product Type | DeviceNet PC interface card |
| Host Bus | 32-bit PCI |
| PCI Format | Half-length PCI card |
| Protocol | DeviceNet |
| CAN Compatibility | CAN 2.0A |
| DeviceNet Data Rates | 125, 250, 500 kbaud |
| Maximum CAN Data Rate | Up to 1 Mbaud |
| DeviceNet Connector | 5-pin connector |
| CAN Interface Isolation | 500 V optical isolation |
| Processor | 40 MHz processor |
| RAM | 512 KB |
| Flash | 512 KB |
| Shared RAM | 256 KB |
| Host Interface Window | 16 KB |
| Power Requirement | +5 V ±5%, approximately 400 mA |
| Operating Temperature | 0 to +50 °C |
| Storage Temperature | −25 to +70 °C |
| PCI Interrupts | Standard PCI interrupts |
| Multi-Card Operation | Multiple cards can be installed in one computer |
| DeviceNet Role | Master / Slave |
| Status Indication | DeviceNet network status LED |
Published technical references consistently identify the 5136-DNP-PCI as a 32-bit PCI DeviceNet interface card with a 5-pin DeviceNet connection, 125/250/500 kbaud standard DeviceNet rates, 500 V isolation, and 256 KB shared RAM.
The older product documentation also lists the 5136-DNP family for DeviceNet Master and Slave applications and identifies Windows XP, Windows 2000, and Windows NT4 among the supported operating-system environments in its historical software documentation.
Product Introduction
The SST 5136-DNP-PCI is a legacy PCI-bus interface card designed to connect an industrial PC directly to a DeviceNet network. It uses a 32-bit PCI interface and a dedicated processor to handle DeviceNet communications, making it suitable for PC-based control, HMI, diagnostics, and industrial data-acquisition applications.
This card matters primarily in existing installations where the host computer still depends on a conventional PCI slot. Its 500 V isolated CAN interface and support for standard DeviceNet data rates make it practical for maintaining older DeviceNet-based systems. The main replacement constraint is not the DeviceNet protocol; it is legacy PCI hardware and software compatibility.
Installation & Configuration Guide
Stage 1: Pre-Installation Preparation — Approximately 10 Minutes
⚠️ Safety First: Shut down the industrial PC and follow the site’s electrical isolation procedure. Do not insert or remove a PCI card from an energized computer. Allow the PC power supply to discharge before opening the chassis.
Tools Required:
- ESD wrist strap
- Phillips screwdriver
- Calibrated digital multimeter
- DeviceNet network documentation
- Wire labels
- Smartphone or camera
- Laptop or engineering workstation with the existing SST DeviceNet software environment
Data Backup:
- Record the complete 5136-DNP-PCI part number.
- Photograph the installed card.
- Photograph the PCI slot position.
- Record the DeviceNet MAC ID.
- Record DeviceNet baud rate.
- Document DeviceNet node addresses.
- Save the existing DeviceNet configuration.
- Record the host PC operating system.
- Record the installed SST driver/software version.
- Document any OPC server, DLL, or application software that communicates with the card.
⚠️ The host PC is part of the compatibility equation. A replacement 5136-DNP-PCI may be electrically correct while the installed computer lacks the required PCI slot or legacy driver environment.
Stage 2: Removing the Old Card — Approximately 5 Minutes
- Shut down the industrial PC completely.
- Remove AC power according to the site’s electrical procedure.
- Open the PC chassis.
- Ground yourself using an ESD wrist strap.
- Photograph the DeviceNet connector and cable orientation.
- Disconnect the DeviceNet connector.
- Remove the PCI retaining screw.
- Release the PCI card from the motherboard slot.
- Pull the card straight out without twisting.
- Inspect the PCI connector and motherboard slot for contamination or mechanical damage.
⚠️ Do not force the card out. Older industrial PCs can have retaining brackets, stiff PCI connectors, or aging motherboard components that are easily damaged.
Keep the original card until the replacement has completed communication testing.
Stage 3: Installing the New Card — Approximately 5–10 Minutes
- Verify the replacement is 5136-DNP-PCI.
- Compare the PCB label and hardware markings against the original.
- Confirm the host PC has a compatible conventional PCI slot.
- Put on the grounded ESD strap.
- Align the card with the PCI slot.
- Press the card straight into the slot.
- Confirm that the card is fully seated.
- Secure the card bracket.
- Reconnect the DeviceNet connector.
- Confirm that the DeviceNet cable is not under mechanical strain.
- Close the PC chassis before applying power.
Configuration Clone — Critical
Do not assume that installing the hardware restores the original DeviceNet configuration.
Record and reproduce:
- DeviceNet MAC ID
- Baud rate
- Master/slave configuration
- Node list
- I/O mapping
- Scan configuration
- Explicit-message configuration
- Application software settings
- OPC/DLL configuration
- DeviceNet diagnostic settings
The historical SST documentation identifies the card as a DeviceNet interface supporting Master and Slave operation and standard 125, 250, and 500 kbaud rates.
Self-Checklist:
- 5136-DNP-PCI model verified
- Compatible PCI slot confirmed
- DeviceNet connector checked
- MAC ID documented
- Baud rate documented
- Node list backed up
- Driver/software version documented
- DeviceNet application configuration backed up
- Card fully seated
- PCI retaining screw installed
Stage 4: Power-On & Testing — Approximately 10–20 Minutes
- Power up the industrial PC.
- Allow the operating system to complete its boot sequence.
- Verify that the PCI card is detected by the host system.
- Check the installed SST driver.
- Start the DeviceNet configuration/diagnostic software.
- Confirm the card is recognized.
- Verify the DeviceNet MAC ID.
- Verify the network baud rate.
- Scan the DeviceNet network.
- Confirm the expected nodes appear.
- Check network status and diagnostic indicators.
- Verify I/O data exchange.
- Confirm the host application receives the expected data.
- Run the machine in a controlled test state before returning it to production.
⚠️ Do not change the DeviceNet baud rate simply because the replacement card defaults differently. All devices on the same DeviceNet segment must operate at the configured network rate.
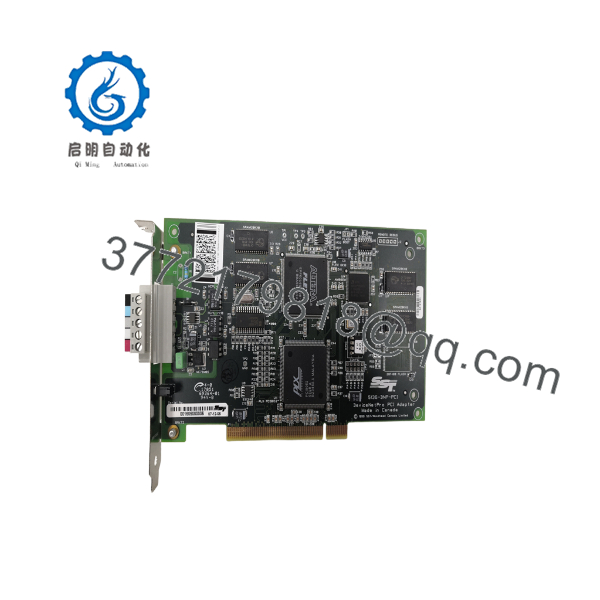
5136-DNP-PCI
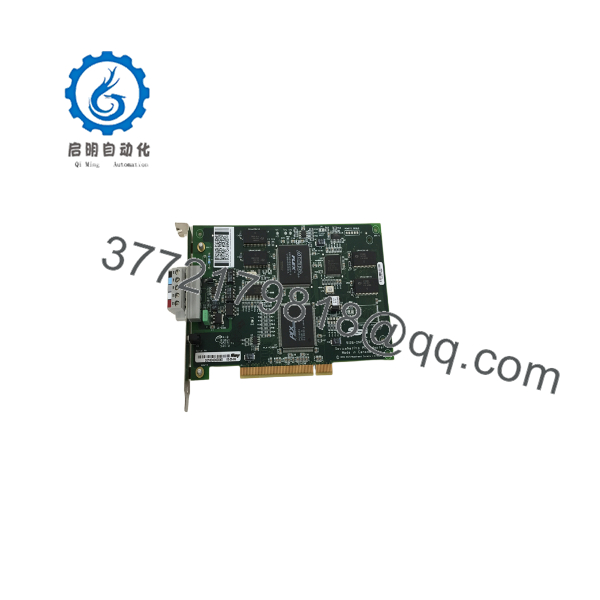
5136-DNP-PCI
Technical Pitfalls and Survival Guide
1. PCI vs. PCI Express
❗ This is the first thing I would check. The 5136-DNP-PCI is a conventional 32-bit PCI card. It is not a generic PCIe card. A modern industrial PC may have only PCI Express slots.
Do not assume a physical adapter will provide a supported replacement. Check the host motherboard and driver requirements before purchasing.
2. Legacy Operating-System Dependencies
Historical SST documentation lists Windows NT4, Windows 2000, and Windows XP among the supported environments.
If your existing PC runs one of these legacy operating systems, replacing the PC at the same time as the interface card can turn a simple hardware swap into a software migration project.
3. MAC ID and Baud Rate
A DeviceNet card can be physically installed correctly and still fail network communication because the configuration is wrong.
Record the existing MAC ID and baud rate before removing the original card.
4. Duplicate MAC ID
If two DeviceNet nodes use the same MAC ID, network communication can become unreliable or fail completely. Verify the replacement card’s node identity before putting it onto the live network.
5. Driver Compatibility
A replacement 5136-DNP-PCI requires a compatible driver/software environment. Do not assume a modern Windows installation will automatically recognize this legacy interface.
The historical documentation specifically associates the 5136-DNP family with SST software components including an OPC server, DLL library, configuration utilities, and network diagnostic tools.
Frequently Asked Questions (FAQ)
What is the SST 5136-DNP-PCI?
The 5136-DNP-PCI is a PCI-bus DeviceNet interface card for industrial PCs. It provides a direct interface between a conventional PCI computer and a DeviceNet network and can be used for DeviceNet Master or Slave applications.
Is the 5136-DNP-PCI still available from the OEM?
This is a legacy product. Industrial automation distributors classify the 5136-DNP-PCI as obsolete or out of stock, so procurement generally involves surplus inventory, specialist distributors, or tested replacement stock.
Do not interpret “in stock” on a reseller page as evidence of current OEM production.
Can I install the 5136-DNP-PCI in a PCI Express slot?
Not as a normal plug-in replacement. The card is specified as a 32-bit PCI interface card, so the host computer must provide a compatible conventional PCI slot.
If the existing industrial PC has been replaced with a PCIe-only system, the engineering problem becomes a DeviceNet migration rather than a simple card replacement.
What DeviceNet baud rates does it support?
The standard DeviceNet rates are 125, 250, and 500 kbaud. Some technical references also specify CAN operation up to 1 Mbaud, but the standard DeviceNet network rates should be used when configuring a normal DeviceNet installation.
What operating system does the 5136-DNP-PCI support?
Historical product documentation lists Windows XP, Windows 2000, and Windows NT4 for the SST PC interface-card software environment.
That is a major consideration for an existing machine. Before buying the card, record the operating system and SST driver revision on the current PC.
Is the 5136-DNP-PCI the same as 5136-DNP-CPCI?
No. They are different host-bus formats.
- 5136-DNP-PCI: Conventional PCI interface
- 5136-DNP-CPCI: CompactPCI 3U interface
Historical product documentation lists both as separate DeviceNet interface cards.
Do not substitute one for the other without verifying the host computer architecture.
Is the 5136-DNP-PCI a ProSoft DNP3 card?
Be careful with the name. The DNP in this model refers to the SST DeviceNet product family; the documented protocol is DeviceNet, not DNP3. Product references identify the 5136-DNP-PCI specifically as a DeviceNet interface card.
Some third-party listings incorrectly describe this model as a DNP3 interface. That description should not be used for procurement.
What condition should I specify when buying a replacement?
For a production spare, specify one of these conditions explicitly:
- New Original / New Surplus
- Factory Sealed
- Refurbished / Tested
For a legacy 5136-DNP-PCI, request photographs of the actual card, including the model label, PCB markings, connector, and any revision information. If the seller claims functional testing, request the actual test report rather than a generic statement.
What should I verify before ordering?
Provide the supplier with:
- Part number: 5136-DNP-PCI
- Host PC model
- PCI slot type
- Operating system
- SST driver/software version
- DeviceNet MAC ID
- DeviceNet baud rate
- Master/Slave role
- Existing application software
- Required condition
The critical compatibility question is not just whether the card can communicate with DeviceNet. The entire chain—PCI hardware, operating system, SST driver, application software, DeviceNet configuration, and field network—must remain compatible.



