
 WhatsApp: +86 16626708626
 Email:
  Phone: +86 16626708626
Description
Key Technical Specifications
- Manufacturer: TMEIC Global, Toshiba Mitsubishi-Electric Industrial Systems
- Part Number: ARND-3119
- Related Board Markings: ARND-3119 A6; 2N3A3119-B must be verified separately
- Product Type: CPU/control board; top board master
- Series: TMEIC ARND Series
- Primary Function: Coordinates rack-level control, backplane communication, and peripheral-module signals
- Application Area: Legacy TMEIC industrial drive, motor-control, and automation systems
- Mounting: ARND-series rack or system-specific board position
- Backplane Interface: ARND-series system backplane; confirm slot and bus-connector alignment
- Configuration Dependencies: Firmware, node/address settings, jumper positions, and host-system configuration
- Lifecycle Status: Legacy/discontinued product; stock and condition vary by supplier
- Replacement Requirement: Match exact ARND-3119 number, revision, physical connectors, and installed board configuration
Available distributor listings identify ARND-3119 as a TMEIC Global CPU/control board and indicate that related ARND-3119A hardware is discontinued. Several aftermarket listings describe ARND-3119 as a top-board master or control interface, but electrical ratings, memory capacity, protocol support, and exact pinout should not be assumed from those listings. Confirm them against the removed board and the OEM system documentation.
Product Introduction
The TMEIC ARND-3119 is an ARND-series CPU/control board used in legacy TMEIC industrial automation and drive-control systems. It functions as a top-board master or core control interface, coordinating signals between the system backplane, peripheral boards, and the main controller in installed production equipment.
The is selected when a plant needs to restore an existing TMEIC architecture without redesigning the rack, wiring, controller logic, or drive interface. Match the full part number, board revision, connector arrangement, firmware, and configuration settings before purchase. This is a legacy item, so verified condition and traceable stock matter.
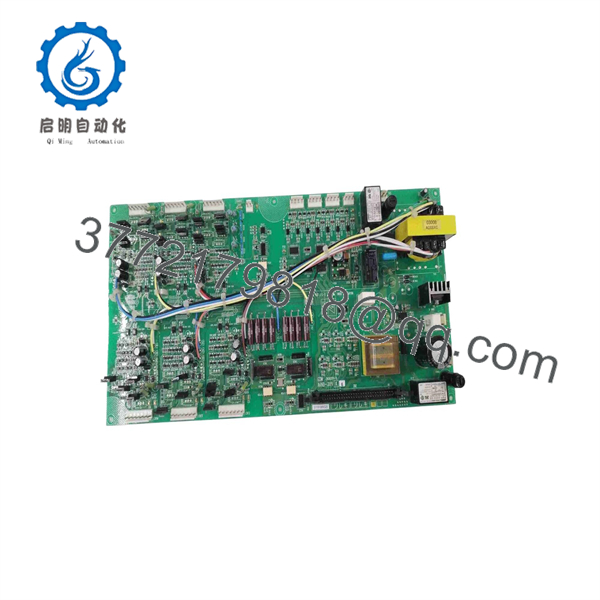
ARND-3119
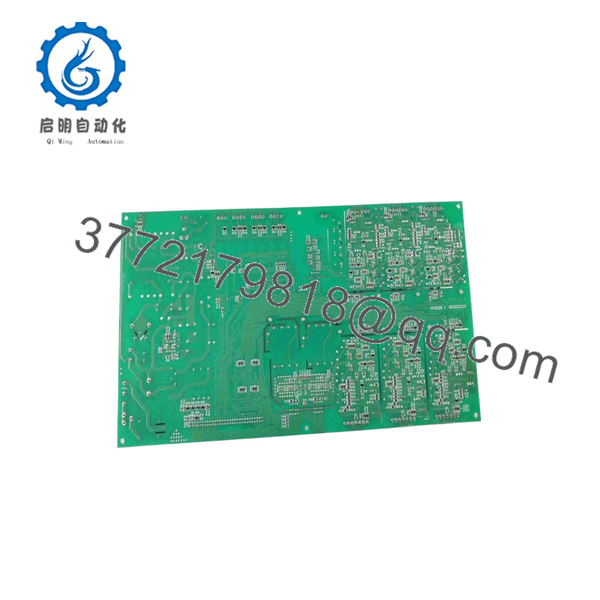
ARND-3119
Troubleshooting Quick Reference
| Symptom | Possible Cause | Relevance to This Part | Quick Check Method | Recommendation |
|---|---|---|---|---|
| No controller or rack LEDs on power-up | Failed cabinet power supply, blown fuse, loose supply terminals, tripped breaker | ❌ Low | Measure the specified control supply at the rack power-supply output and verify fuse continuity with power isolated | Repair the supply path before replacing the |
| System does not boot or remains in fault state | Failed , bad board seating, bent backplane connector, incompatible board revision | ✅ High | De-energize the cabinet, inspect the board edge connector, reseat the board, and compare labels with the removed unit | Replace the board only after confirming power supply and correct physical fit |
| Communication timeout with HMI, PLC, or drive controls | Incorrect address setting, cable fault, missing termination, firmware mismatch, controller issue | ✅ Medium | Photograph DIP switches and jumpers; inspect network connectors; check diagnostic logs before removing the board | Restore the original switch settings and confirm firmware compatibility |
| I/O points fail but CPU remains online | Field wiring fault, local I/O board failure, failed relay, output fuse, inhibited logic | ❌ Low | Inspect LEDs on adjacent I/O boards; measure field voltage at terminal blocks; review permissives and interlocks | Troubleshoot the local I/O circuit before replacing the |
| System starts but faults when warm | Poor cabinet cooling, unstable supply voltage, oxidized contacts, temperature-sensitive board fault | ✅ Medium | Record the time to fault; check fan operation; inspect filters; measure rack power supply under operating load | Correct cooling and power issues first; bench-test or replace the board if the fault follows it |
| Fault appears immediately after board replacement | Wrong revision, incorrect jumper/DIP setting, missing configuration backup, improper connector seating | ✅ High | Compare every board label, connector key, switch position, and removable memory device against the old board | Remove power and correct configuration before attempting repeated starts |
| Random resets during drive acceleration or heavy load | Rack supply sag, ground noise, control power wiring issue, internal board fault | ✅ Medium | Use an oscilloscope or logging meter to check supply stability during the event; check protective-earth continuity | Verify supply capacity and grounding; retain at least a 20% power margin |
| Visible corrosion, damaged pins, rework traces, or overheated areas | Improper storage, contamination, mechanical damage, prior repair | ✅ High | Inspect under strong light and magnification; compare connector pins and solder-side condition | Do not install a questionable board in a live production system; request condition photos and test evidence |
❗ Firmware mismatch: Document the firmware and all visible board labels before removing the failed unit. I have seen a technician install a newer-looking board, power it up successfully, and then spend two days chasing a communication timeout caused by a revision mismatch. A successful boot is not proof of compatibility.
❗ DIP switches and jumpers: Take pictures of the old board before touching anything. This is the most common avoidable error. Node address, bus termination, and operating mode may be set physically, and the replacement board may arrive in a different factory configuration.
❗ Terminal and connector assumptions: Do not rely on the connector shape alone. Similar ARND boards can have different signal assignments or board positions. Check the OEM wiring drawing and the rack location before installation.
❗ Power draw and rack health: A borderline power supply can make a good replacement board look defective. Measure supply voltage under normal operation and during acceleration, contactor pickup, or high-load events.
❗ ESD precautions: Wear a grounded wrist strap and use an ESD-safe surface. I once watched a technician handle an expensive control card during dry winter weather without a strap; it powered up once, failed intermittently after warming, and turned a quick swap into an outage investigation.
Contact technical support with photos of the full board, part-number labels, installed rack location, connector faces, switch settings, and controller diagnostics if the fault remains unclear. Keep these checks in mind and you will save yourself 90% of typical rework time.
Frequently Asked Questions
Is the TMEIC obsolete?
Treat it as a legacy part. Current listings position as a maintenance and replacement board for installed TMEIC ARND-series systems, while the related ARND-3119A is listed by a distributor as discontinued by the manufacturer. Confirm current stock, lead time, condition, and warranty on the exact offered unit before releasing a purchase order.
Is a direct replacement for ARND-3119A?
Not automatically. and ARND-3119A are different complete part numbers. The suffix may represent a board revision, component change, mechanical variant, or system-specific configuration. Verify the removed board’s complete label, connector layout, revision, firmware, and jumper configuration. Do not substitute based only on similar board appearance or an online listing title.
Can I hot-swap an control board?
Do not hot-swap it unless the exact TMEIC system documentation explicitly allows it for that board position. A top-board master or CPU/control board may carry backplane power, control-bus signals, configuration data, and interlocks. Removing it under power can damage the board or interrupt connected equipment. Use the site-approved lockout/tagout process and isolate control power first.
Will the program remain after I replace the ?
Maybe, but verify before removal. The application program and configuration can reside in a host controller, a separate memory device, nonvolatile memory on the board, or the engineering workstation backup. Back up the controller project, save diagnostics, photograph settings, and identify any removable memory or daughterboard that must move to the replacement assembly.
What must I send to confirm compatibility?
Send clear photos of the following:
- Full front and rear views of the installed
- All part-number, revision, serial-number, and date-code labels
- Connector faces and rack slot position
- DIP-switch, jumper, and rotary-address settings
- Any plug-in memory, daughterboard, fuse, or transformer assembly
- Controller alarm history and communication fault codes
- Host equipment or drive model number
That information prevents the expensive mistake of ordering a board that physically fits but does not communicate correctly.
Why can New Surplus stock cost less than factory supply?
New-surplus inventory typically comes from unused site spares, canceled projects, excess stock, or decommissioned inventory channels rather than active OEM production. Lower cost does not necessarily mean lower quality, but it does mean you should ask for actual product photos, packaging condition, traceability details, test documentation, warranty coverage, and return terms.
What condition should I choose: New Surplus or Refurbished?
Choose New Original / New Surplus when you need an unused board with original labeling and proper storage history. Choose Refurbished (tested) only when the supplier can explain exactly what was inspected, repaired if applicable, and tested.
For a refurbished , require controlled power-up on a compatible TMEIC test setup, board-status verification, backplane/communication checks where available, connector inspection, thermal run testing, and a documented test report. For either condition, require ESD-safe packaging, anti-static bagging, foam or bubble protection, and a heavy-duty outer carton. Test videos and photos should be available upon request.



